
Introduction
This article is an attempt to explain and illustrate how I usually go about my animation
process, from idea to finished animation. If you haven't read it yet, you may also
want to read
my "Character Animation:
Principles and Practice" article on my site.
Keith Lango has a really really good animation tutorial explaining blocking and pose to pose stuff more in depth than what I do here. You should definitely check it out too!
Starting Out
This particular case study is from an animation done for the
10 Second Club.
The club is a little animation email group that has a 10 second length audio clip
every month that people can practice animating to, and then vote on.
The clip here is from November 2001, and is a soundbite of Christopher Walken from Mouse Hunt, saying "You have to get, inside their minds...you have to know what they want, need, you have to think, like a mouse."
You can Download the Audio Clip yourself.
Each part of how I approach and my animation process is described below. At the end of each, is a link or image you can click on to download that particular animation for that step, to see how my progress looked.
Listen to This!
Probably the most important thing at this and later stages it to continually listen to
the audio itself. Figure out where it rises, where it falls, where the accents are,
what parts need major poses, what parts can be the same pose, but with smaller flourishes
and detail inside. And of course, what is the emotion, what is the acting behind it
all. What is going on inside the characters brain while he speaks and pauses?
I'm all too guilty many times of just running ahead of starting out, but if you can take the time to sit there and loop the audio over and over again listening to it, getting idea, it will make your animation stronger.
After listening, and usually physically acting out some of the motions myself, I'll do one of two things. I'll either start right on the computer blocking poses in, keeping in mind what I thought of, and working with poses, but putting them in one after the other (in a somewhat straight ahead fashion). Or else, I'll sketch out my ideas on paper. Both are about the same, but the paper helps to have something to look at and go back to later on. Especially if you mark down facial emotions, it can help you out.
My sketches are usually quite simple and fast when I do them, just enough so that I can remember myself what I am doing and where I want to go. I'll usually end up with a variation of my sketch in the final product. That is I won't hold myself to it later if I want to change something. But it's a good place for me to start.
Here is the sketch I did for this particular clip:
Layout & Blocking
The first 3D step I take is getting the character, background and camera all working
how I want. Layout is the first pass at this, which basically consists of me posing
out the first frame, getting the set pieces made if needed, and framing the camera.
Once I'm happy with the layout of the shot, I'm ready to actually start animating. I'll look at my thumbnail sketches if I have any. I scrub the audio, and start putting in my key poses.
At work I've used "Step" keys. This way if I have a pose at frame 1, and then another pose at frame 20, I can just key those 2 frames. Everything "holds", there is no interpolation. At work we've termed this "pop-thru" (once again see Keith Lango's Tutorial as well), because everything seems to "pop" from one pose to another, because there are no inbetween frames.
In MAX it's a bit of a pain to have to switch from step keys to linear keys and such, and in addition, I wanted to kind of get a feel for the timing just a tad more, especially since it is such a subtle clip. Therefore I opted to just use "Linear" key interpolation instead.
If I wanted a pose, once again on frame 1 and 20, what I would do is pose the first one on frame 1. Then figure out how long to hold the pose, say maybe I want 15 frames, so I'd go to frame 15, key all the character body parts there the exact same as on frame 1, and then go to frame 20 and key the second different pose. That way things stay the same and don't interpolate from 1-15, then there is a 5 frame change, and then the next pose on 20.
I pretty much continue this cycle of new pose, hold pose, then new pose, hold pose, until I am done. In some cases as shown here, I have some moving holds, because in reality the poses weren't supposed to pop. However as you notice, it is still very very rough.
The idea at this "Blocking" stage is to simply get a quick picture of what the poses are, and what is happening in the shot to make sure it looks ok. The important aspect of this block stage are:
Rough Animation
After I am pretty sure of my main poses, acting, and basic timing, I'll go in and start
to tweak. Everything is still kept with "Linear" keys, so that I don't have to worry
about splines interpolating wrong. At this point I'll start by adjusting the timing
of the poses and their transitions.
Once I'm happy with that I'll also start to add more flourishes or sub-poses, which are really just the same pose, with some variations in them. I'll also add anticpation and follow through as I progress.
The idea here is even with linear keys, the animation should start to look more complete. If I key more than one part of the body, then I'll still make sure all the keys are on the same frame. ie: there is no offsetting. But there is more detail and refinement in the poses, timing, and details.
I usually work in blocks, of 50-100 frames or so at a time. That way I can focus on just a small chunk, make it look good, then continue forward. Below are 3 clips of my progress through the rough stages.
Notice on the first Rough 1 movie, all I really did was start to add detail to the beginning of the clip, since I hadn't gotten farther yet. In the Rough 2 movie, things have been fleshed out pretty well. I don't usually do any facial animation so the face is hidden, although I did do a quick eye move to help me read what was going on. In Rough 3, I decided to push the poses a bit more, exaggerating some of the moves a little bit more extremely to add some variation.
The important things about the Rough stage are:
ROUGH 1 Movie
|
ROUGH 2 Movie
|
ROUGH 3 Movie
|
Facial Animation
After pretty much finishing up the body in a Linear state, I start work on the facial
animation. I'll typically start by doing just the mouth, and making the lipsync look
ok. This is the Facial 1 movie.
Then I'll go back and add some emotion into the mouth, adding more or less smile or frown around what is going on in the lipsync. The keys are all still Linear in this stage as well.
After the mouth is done, I'll go and start the eye motion. Typically I'll animate the brows and lids for expression as needed. All Linear keys, but with no blinks yet. Just keys for expression poses to keep things neat and clean in my timeline. That is the Facial 2 movie. I'll also make sure the eyes are looking where they need at this stage.
Eventually I'll be ready to tweak any lipsync and facial issues and to add blinks into the poses. Essentially fixing up the facial animation as needed, all with Linear keys still. This is the Facial 3 movie below.
The aspects of this phase of the animation for me are:
|
FACIAL 1 Movie
|
FACIAL 2 Movie
|
FACIAL 3 Movie
|
Cleanup Animation
At the end I start my "Cleanup" phase, where I adjust my keys to be smooth. We have a tool at work for Maya, and one I wrote at home in MAX that switches keys to "smooth",
but without any extra accidental overshoot. (See the keyManager script with
cometSmooth available for download on
my 3D Help Page.
This allows you to get perfect smooth motion but with no computery accidental peaks or valleys in the interpolation. Normally you'll have to change things to spline/smooth, and then manually tweak tangent handles to get rid of overshoot if it occurs.
I then see how it looks, and tweak things accordingly, maybe offseting some things, making slight adjustments etc... This is where you can offset rotation keys from translate if desired, or just offset each spine bone one frame later, and so on, as needed or desired.
I tend to preview these at a larger resolution since I want to make sure it will hold up when it goes to video on a bigger screen.
This phase has:
|
CLEANUP 1 Movie
|
CLEANUP 2 Movie
|
Final Animation
Once I'm done with the animation, I'll take care of any special lighting or rendering
issues. I may or may not tweak things a bit more if I start to notice stuff and have
time.
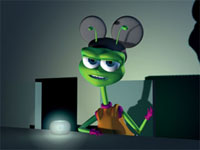
The final animation I did is shown below.
That's All!
So how long did it take me? I actually tried to keep good track of my
time for his one... What follows is each stage of the animation I went through
and how long it took me. Each of these relates to a preview animation clip for
download above.
		Thumbnail Sketch	0.5 hrs

		Layout, Set, Blocking:	1.5 hrs

		Rough 1:		1 hr

		Rough 2:		2 hrs

		Rough 3:		2 hrs

		Facial 1:		1 hr

		Facial 2:		1.5 hrs

		Facial 3:		2 hrs

		Cleanup 1:		0.5 hrs

		Cleanup 2:		1.0 hrs

		Lighting/Final Tweaks:	1.5 hrs

		--------------------------------

		TOTAL			14.5 hrs approixmate
That's about it. We tend to animate about 15-20 seconds a week where I work, so this isn't too bad. There's some acting issues I probably would have changed, but I opted to keep what I had when I started so that this article fit together nicer.
Special Thanks
Rick May for runnning and maintaining the CG-Char Forums.
Keith Lango for his help and support. Check out his cool tutorial that is more in depth on all of this animation stuff!
Discreet for making such a cool program!
All those guys on the Penguins Team at Big Idea that either taught me or made me learn what I know about rigging. :)
About the Author
Michael Comet is currently a Rigger/T.D. at Blue Sky Studios
in New York. Previosuly he worked as Video Team Lead Rigger and a
3D/Animator/Artist at
Big Idea in
Lombard, IL where he was an Animator/T.D. on the first three Penguins episodes,
as well as several Veggie Tales Videos.
Previously he was lead animator at the video game company Volition, Inc., where he animated most of the cinematic
sequences for Descent: Freespace, and headed up much of the realtime character animation and cinematics
R&D for their RPG title, "Summoner". He can be reached via email
at comet@comet-cartoons.com, and has a
personal homepage at: http://www.comet-cartoons.com/
which has more information and samples of his work.
About the Sample Images & Animations
This article, all images, animations, and text are Copyright ©2001 Michael B. Comet
All Rights Reserved.
This article may be reprinted for personal use only. It may not be packaged or sold in part or in whole, either alone or as part of another package, book, magazine or any other item. Unauthorized duplication is strictly prohibited. This article and related artwork, samples or text, are not to be copied onto other sites without prior written consent from the author. When in doubt, ask.